tisdag 28 februari 2012

Tutorial: Deep blue sea

Hello everybody! :)

Today I'm using two of the M.A.C. eyeshadows that I got for my birthday; Deep truth and Electric eel. I've never really cared that much for blue eyeshadow but these two are adorable.

The left swatch is the eyeshadow on top of NYX Jumbo Pencil in Milk while the right one is the eyeshadow on top of bare skin. Not much of a difference but I thought I'd show you anyway. :)


Electric eel is a bright blue with a satin finish and a subtle shimmer.

Deep truth is one of my favorite eyeshadows of all time! It's so pretty and the picture does not give justice to the sparkling awesomeness going on in this midnight blue eyeshadow. And the best thing? It's totally suitable for goth makeup looks! :D


So here's the look we are going to create with these eyeshadows.


It really bothers me that Deep truth grey rather than blue and sparkly in these pictures. :(


Anyways, here comes the tutorial:

Step 1
Apply your base. Prime your eyes and apply NYX Jumbo Pencil in Milk in the inner corner of your eye.

Step 2
Apply Deep truth in the outer corner of your eyes creating a cat eye shape.

Step 3
Blendy blend! But not too much.

Step 4
Pack on some Electric eel in the inner half of your lid, leaving a little pocket for highlighting in the innermost corner.

Step 5
Put some Electric eel above Deep truth. Blend out but, again, not too much!
Apply Gesso by M.A.C. as a highlight in the inner corner and under your eyebrow.

Step 6
Clean up the outer edge of the eyeshadow with a little bit of makeup remover on a Q-tip.

Step 7
Line your upper waterline and lash line with the gel liner Blacktrack (also by M.A.C.). Create a little "extension" of the inner corner of your eye. Also line your lower lash line, getting as close as possible to the lashes, and create a little flick on both the inner and outer corners.

Step 8
Liner your waterline with the Chromagraphic pencil Hi Def Cyan by M.A.C.

Step 9
Fill in your brows with Charcoal brown by M.A.C.
Apply mascara and a pair of huge eyelashes (Stargazer #16)! :)


The lips I kept natural, filling them in the same way as in the tutorial yesterday.

Have a nice day!

måndag 27 februari 2012

Tutorial: Leopard print eyes

Hello everybody! :)

The rain is pouring down here and it's a dull monday. So a pop of color is exactly what we need! :) The key to the leopard eyes look is to make not too many dots but not too few either. If you make too many it's going to look a bit messy but if you make too few it will look quite poor. What's too many or too few might be a question of taste though!


So let's get the tutorial started!

Step 1
Apply your base and prime your eyes. Line your upper and lower waterline with a black eyeliner pencil. Put a little amount of NYX Jumbo pencil in Milk on your lid. Smudge it out with your finger but don't take it into the crease!

Step 2
With a flat shader brush apply Chickadee by MakeupGeek over the lid and a bit above the crease. Blend it out with a fluffy brush.

Step 3
With a smaller sized blending brush or pencil brush, apply Latte by MakeupGeek in the crease and blend it into Chickadee.

Step 4
In the outer corner (deep crease) apply Cocoa bear by MakeupGeek and blend it out well. Also apply a matte white in the inner corner and right under your brow. I've used Gesso by M.A.C.

Step 5
A little more dimension is needed so let's open up our gaze a bit with a dab of Glamorous (by MakeupGeek) in the center of the lid.

Step 6
Fill in your brows with Latte (MakeupGeek).

Grab your black gel eyeliner and line your upper lash line! Since we're going leopard here, we want the eye to get a more catlike shape. Create a little "extension" in the inner corner of the eye and an extra long wing in the outer corner.

Step 7
Pop on some mascara.

Now, it's time for the dots! To create these I'm using a liquid eyeliner. Draw for dots similar to those on the picture. It doesn't have to be and exact copy!


Step 8
For more dots!

Step 9
Five smaller, filled dots evenly distributed between the larger dots.


Step 10
Fill in the dots with Mocha by MakeupGeek. This really makes all the difference!

Step 11
Put on a pair of falsies and the eyes are done. I'm using Ardell #105.


I like to pair this eye makeup with a nude lip just to give the eyes some extra focus. To get an extra sheer layer of lipstick I applied it with my finger. I've used Clinique Creamy nude and a concealer in the center of the lips to add some more dimension.

I hope you liked this tutorial. Have a nice day! :)

söndag 26 februari 2012

Tutorial: Parfait Divine

Hello everybody!

Now, after my birthday and having got the Makeupgeek eyeshadows, I have got so many eyeshadows that I have to test! Well, I'm not complaining. ;) Many eyeshadows equals many new tutorial ideas!
The look of today can be wore as an everyday look or a night out look depending on your personal preferences.

The combination of a cold grey and a cold purple is flattering for all eye colors and a variation of the classic smokey eye for those who want a subtle pop of color. It might not be the most interesting look but it's definitely wearable! :)


Step 1 
Apply your base and prime your eyes.

Step 2
Line your upper and lower waterline with a black eyeliner pencil. I'm using Smolder by M.A.C. Also run the pencil through your lower lash line. Smudge it out with your finger or a small brush.

Step 3
With a flat shader brush apply Knight divine by M.A.C. (or another shimmering dark grey) in the outer corner of your lid. Isn't that color gorgeous? :D

Step 4
Blend out Knight divine but be careful not to take it to high up against the brow.

Step 5
Take Knight divine beneath your lower lash line and blend it out. On the rest of the lid apply NYX Jumbo Pencil in Milk.

Step 6
With another flat shader brush, pack on Parfait amour by M.A.C. on top of Milk. Also apply it in the inner part of your lower lid.


Step 7
Highlight the inner corner of the eye and the space just beneath your eyebrow with a matte (or shimmery) white. I'm using Gesso by M.A.C.

Step 8
With an angled brush trace your upper lash line with a black eyeshadow. Fill in your eyebrows. I've used Charcoal brown by M.A.C. but you can use whatever color suits your natural brow color.

Step 9
Pop on some mascara and a pair of false eyelashes! :) The lashes I've used are #747S by Red Cherry.

Step 10
Line your lips with a red lip liner. I'm using Revlon ColorStay Lipliner in Wine. Apply a red lipstick with a blue undertone. I've used Russian Red by M.A.C. (to complete the M.A.C. frenzy...).


For blush I used Shy by e.l.f.

Have a lovely day everyone and see you tomorrow with another tutorial! :)

fredag 24 februari 2012

Tutorial: Spring trend look

Hello everybody!

Has anyone noticed the increasing number of makeup pictures with a blue waterline that has come up lately? It's a great and interesting look, very suitable for spring! :)

I was inspired by this look in September last year by a friend on Dayviews, MrBarbie, who has created the most amazing version of this look!

Here's my version of this look anyway:


Let's get the tutorial started! :)

Step 1
Apply your base and prime your eyes. In the inner corner of your eye, apply NYX Jumbo Pencil in "Milk" and blend it out with your finger so it covers the lid in a thin layer. Set it with some "Gesso" by M.A.C.

Step 2
With a small blending brush or pencil brush, apply "Charcoal brown" by M.A.C. in the crease. Note that we are not going to take it down all the way to our lower lid in the outer corner. Blend the shadow out using small circular motions, going back and forth in your crease.

Step 3
In the deep crease, that is the outermost part of your crease, apply "Embark" by M.A.C. This will give a little more depth and dimension.

Step 4
Using a black gel liner and a thin brush, line your upper lash line creating that traditional retro/pinup winged eyeliner. Also line your upper waterline with the gel liner! If you need some advice on how to get the eyeliner good, check out this tutorial:
http://madamnoire.blogspot.com/2012/02/tutorial-lucky-green-retro-glam.html

Step 5
On your lower waterline, apply a bright blue or turquoise eyeliner pencil. I'm using M.A.C. Chromagraphic Pencil in "Hi Def Cyan". Smudge the color into your lower lash line as well.

Step 6
Fill in your brows with "Charcoal brown" and an angled brush.

Some black mascara and a pair of false eyelashes and you're good to go! :) The lashes I'm using are Red Cherry #110.

Step 7
I think this look is prettiest combined with a peach or coral blush and lipstick, although these colors aren't normally my cup of tea. I've used the blush "Glow" by e.l.f. and a coral lipstick which I unfortunately don't know the name of. :(  But any warm coral or peach will work! I think the M.A.C. Viva Glam lipstick in "Nicki" would be great combined with this eye makeup.

I hope you liked this tutorial. Have a lovely day! :)

torsdag 23 februari 2012

Review: Makeup Geek eyeshadows!

Hello everybody! :)

First of all I would like to say thank you to Makeupgeek for sending me these eyeshadows! :) Ever since they got out I've wanted to try them out and today I got twelve of them to dig my makeup brushes into.
And to my readers: I assure you that this review is honest and that the opinions are completely my own. I wasn't paid to do this review or anything.

I know I said earlier that I'm not that fond of swatches - well, I've changed my mind completely about them! :) Swatches are great, how could I miss that fact before? And they're fun to make too!

Anyway, I've divided the Makeup geek eyeshadows I got into two categories; natural and colorful. My overall impression is that they are really good eyeshadows and absolutely worth the $5.99 that you can buy them for at www.makeupgeek.com. However, the pigmentation varies between the different shadows.

To make this review easier to grip I'm going to rate them from 1-5 where 1 is lowest and 5 is the highest.
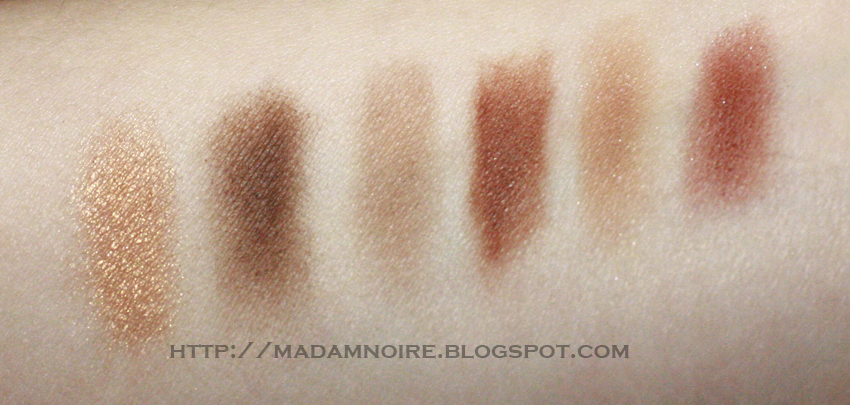
The natural


From left to right: Glamorous, Mocha, Latte, Cocoa bear, Purely naked and Country girl.


The colorful


From left to right: Poolside, Peacock, Sensuous, Wisteria, Razzleberry and Chickadee.


Now we're going to dig deeper into the colors. :)

NOTE: THE SWATCH TO THE LEFT IS THE EYESHADOW ON TOP OF NYX JUMBO PENCIL IN "MILK" AND THE SWATCH TO THE RIGHT IS ON TOP OF BARE SKIN. 

Glamorous is a golden bronze with a shimmery finish. The pigmentation for this eyeshadow is great and it's actually not that much difference when putting it on top of NYX Jumbo Pencil in "Milk".
This is one of my favorites from the MUG eyeshadows!

Rating: 5

Mocha is a matte dark brown, a basic color that suits every makeup bag! I didn't find the pigmentation of this eyeshadow superduper good but it's not bad either.
On top of NYX Jumbo pencil in "Milk" it looks just great!

Rating: 3

Latte is another coffee-shadow which has a medium brown color and a matte finish. This has not as good pigmentation but as you can see in the picture using NYX Jumbo pencil in "Milk" will solve the problem.

Rating: 2.5


Cocoa bear is another one of my favorites. It has a cuddly, warm reddish brown color - just like your favorite teddy bear! :)
Not too bad pigmentation and it looks great both with and without a white base.

Rating: 5


Purely naked, a soft nude brown with a subtle shimmer.
This one has a great pigmentation!

Rating: 4

Country girl, is another reddish/pinkish brown, but in contrast with Cocoa bear it has small flecks of shimmer in it. It is a pretty color but the pigmentation isn't that good unless you use the white base.

Rating: 2,5


Poolside was the eyeshadow that attracted me most of all of the Makeup geek eyeshadows and it didn't leave me disappointed! I love teal and this one has a pretty golden shimmer in it. Love, love, love! :D

Rating: 5

Peacock was quite a disappointment. It's also a teal but a really dark one. Unfortunately the pigmentation is poor and looks kind of grey on my skin. Here, the NYX Jumbo Pencil in "Milk" really makes the difference!

Rating: 2

Sensuous is a pretty, pretty purple with shimmer and flecks of sparkly silver. The pigmentation of Sensuous is not too bad but it could have been better. Overall I really like this shadow!

Rating: 4

Wisteria is a matte lavender which makes me think of cupcakes and candy. The pigmentation is a little bit too poor though and since I'm so pale it doesn't show up so bright on my skin.

Rating: 2,5

Razzleberry was one of the shadows on which I had high hopes. I love red eyeshadow but most red eyeshadows shows up quite pale on the skin. This one is unfortunately not an exception.
When put over NYX Jumbo Pencil, though, it is utterly pretty with it's golden sparkles so I can't do anything but liking it! :)

Rate: 4


Chickadee is a burnt orangey yellow with a matte finish. It is crazy pigmented and the color is quite unique. When put on top of NYX Jumbo Pencil in "Milk" it turns out a little more orange.

Rating: 5


So, as I said, overall I really like these eyeshadows! :) I'm definitely going to try out the rest of them as well some day!
Tomorrow I will probably make a tutorial, either with these shadows of with my new M.A.C. ones.

I hope that this review has been helpful!