
Hello everybody!
I hope that all of you have had a lovely weekend! Personally, I've been kind of busy making (and eating) cupcakes, writing on my book and been taken out to dinner by Mr. Noire.
Anyways, last Friday I did this look which is inspired by the Hunger Games, that, conveniently enough, had premiere that very same day. I haven't seen the movie yet, but I'm planning on doing so sometime soon. Right now I'm reading the first book and I was caught from the first page. :)
So, here's the look we are going to create!

Obviously the inspiration to this look is the fire and the black on the Hunger Games movie poster. :)

If you're interested in re-creating this look, you might want to read further! :D


Step 1. As always, start by priming your eyes. Note that I'm going to apply the base after we're done with the eyes.

Step 2. With a soft, black eye pencil fill in your lid and blend it out with your finger into your crease.

Step 3. Since we want our lid to be the blackest of black, we're going to put a black eyeshadow over the eye pencil.

Step 4. Above your crease apply a bright red eyeshadow with a blending brush. This is Love+ by Sugarpill.

Step 5. Above the red eyeshadow apply an orange and blend the two together. This is Flamepoint by Sugarpill. I realize it might be hard to see the orange on this picture, but imagine it as a gradient going from deep red to vibrant orange. :)
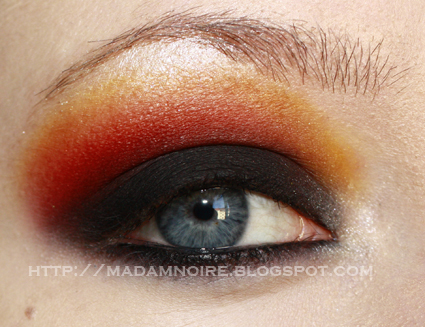
Step 6. Above the orange apply a yellow. This is Buttercupcake by Sugarpill. Make sure that the fire colors are blended in well together. In the inner corner and right under your brow, apply a shimmery white. This will help emphasize the glowing effect.

Step 7. Fill in your brows with whatever eyeshadow that matches your natural brow color. I've used Charcoal brown by M.A.C. Apply some black mascara. The look is perfectly fine without false eyelashes but since I'm addicted to them I've applied #28 by Red Cherry, which you can see in the finished pictures in the beginning of this post.

For my lips I just used a nude lipgloss. Since the eyes are so bold and firey I figured a bold lip would be kind of off. If you want to make this look even more bold though I would recommend choosing a black lip. That way you get a firey and gothic look! :)
That's all for this post, folks! Hope that this tutorial has been to some help for you!

Wow! This is stunning in its boldness. I always used to do my darkest colors last, and found them hard to blend, or to get them dark enough. Now I realize I've been doing it backwards. :)
SvaraRaderaThank you! :) Sometimes I add the darkest color last too. But for looks where the darkest color is close to the lashline and ten fades out in a gradient I think it's easier to apply the darkness first. :)
Radera