lördag 20 april 2013

Inglot Eyeshadows Swatches

This past week I've been working a lot which has meant a lot less time for blogging. And honestly, I haven't really felt like doing a review or anything, and this will not be a review either, and I did not have any un-posted looks in stash for you. That's why it has been so very quiet here this past week.

Now, here's the swatches of my Inglot eyeshadows. :)


Swatches on bare skin. 


Swatches over Nyx Jumbo Pencil in Milk

These eyeshadows are amazing. All of them, except the black one, which is a dark grey rather than a black, are highly pigmented very easy to work with. It is hard not to love them. :)

Have you tried out any of the eyeshadows from Inglot? Do you like them?

Coming up as soon as I get my thumb out of you-know-where I will do a Rammstein-inspired look requested by my dear reader Poisoned Purple. :)

Thanks for reading!


fredag 12 april 2013

Birthstones: Diamond

2013 has already dragged us into April and it is time to do the Birthstone look for this month, which is inspired by the classiest of all rocks; the diamond. When I first started out this makeup series I thought that the diamond would be the hardest look to create, but I am actually very happy with how it turned out! :)


The silver eyeshadow creates a perfect base but this look would be nothing without the rhinestones. ;)


A warm toned blush and dark plum lips goes well with the rest of the makeup.


Face
*Matte foundation Fair (Bare minerals)
*Blush Glow (e.l.f.)

Eyebrows
*Browshadow Dark brown (Anastasia Beverly Hills)

Eyes
*Shadow Insurance (original) (Too Faced)
*Milk Jumbo pencil (Nyx)
*Mercury (Makeup Geek)
*Ice queen (Makeup Geek)
*Platinum Pigment (M.A.C.)
*Glossy Waterproof eyeliner (Isadora)
*Drama mascara (Make Up Store)
*False lashes #601 (Red Cherry)

Lips
*Megalast lip color Vamp it up (Wet n Wild)

-------------------------------------------------------------------------------


Step 1. Apply foundation and fill in your eyebrows. We are not using any dark, fall out-prone eyeshadows today so we can do our base before the eye makeup this time. :) 


Step 2. Apply Nyx Jumbo Pencil in Milk all over your lid, all the way up to the eyebrow. If your eyes didn't look red and bloodshot before they sure do now! ;P 


Step 3. Pack on Makeup Geek's Mercury eyeshadow over the lid. 


Step 4. Blend Mercury out using a shimmery white eyeshadow. Also pop the white into your inner corner. 


Step 5. Carefully pat some high-shine silver pigment onto the middle of the lid and a little on the lower lid as well. I think the perfect pigment for this would be Tiara by Sugarpill, but I don't have it so I used M.A.C.'s Platinum instead. 


Step 6. Apply a very thin line around your upper lashline and extend it into a delicate flick. 


Step 7. Mascara and falsies. Also, apply white eyeliner to your waterline. 


Step 8. First row of rhinestones glued on with Duo Lash Glue. The bigger rhinestones are 3 mm and the smaller 1.5 mm and can be found in various Ebay-stores. 


Step 9. Second row. Finished!

-------------------------------------------------------------------------------

I hope that you liked the look and that you found this tutorial helpful! :) It's definitely not as uncomfortable as it looks to wear rhinestones on your eyelids and the effect is phenomenal so you should definitely give it a try if you feel tempted. :)

Thanks for reading! Have a lovely weekend!


onsdag 10 april 2013

End Of An Era

First of all I want to thank you for your suggestions on how to improve my blog! :) Your comments have really given me loads of inspiration! :D

I got a request to do a look inspired by the one that Tarja Turunen wore at her last concert, "End of an era", as the lead vocalist for Nightwish in Hartwall Arena, 2005. Nightwish was for many years my favorite band and the band that lead me into the realm of alternative music (which is strange since I can barely stand metal music today ;D).

Source
Tarja is a beautiful woman with a great taste both when it comes to makeup and clothes. And above this she is an extremely talented singer! :)

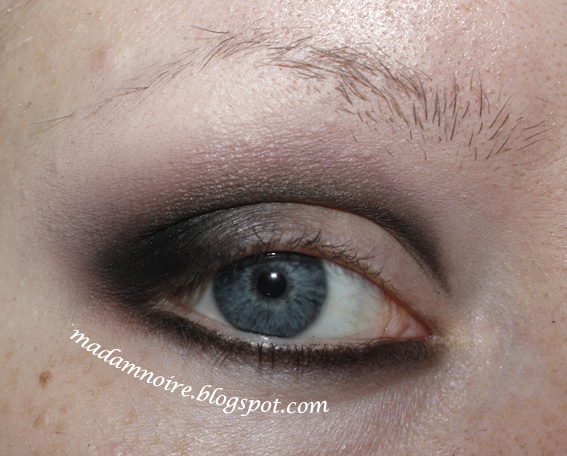
This is the result of my efforts to recreate her look:


Want to know how to do this look? :) Keep on reading sweetie!


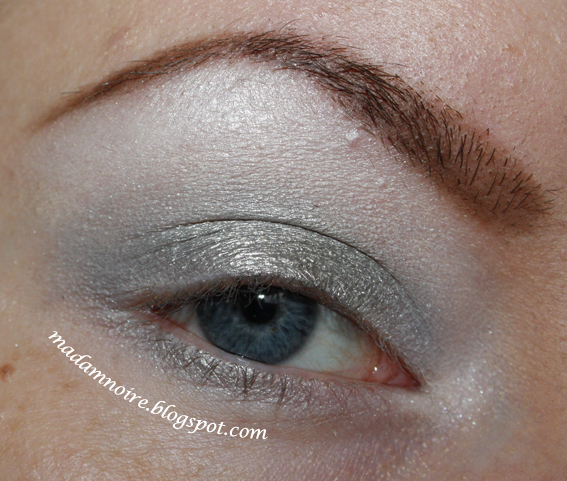
Step 1. After having primed my lid with Too Faced Shadow Insurance I mapped out the cut crease with black eyeshadow and softly feathered it out upwards. We are going to define the crease further later on.


Step 2. Using a mixture of Makeup Geek Cupcake and Unexpected I made a transition color from the crease and upwards, that will help the black blend better into the skin. Remember to keep the overall shape of your eyeshadow rounded!


Step 3. Now it's time for definition! Apply more black along the creaseline and in the outer corner. Blend. Apply black underneath the eye and feather out softly.


Step 4. With a wet brush apply Goldilux by Sugarpill over your lid and blend it into the black in the outer corner.


Step 5. Apply your base (foundation, concealer, powder) and then fill in your brows. Tarja has fair brows so I used the light taupe Velvet revolver by Too Faced as a brow color. (The brow color barely shows up because of the flash...) Also, "close" the crease by very, very softly extending the creaseline towards the inner corner and marry it with the black eyeshadow underneath the eye. Very Tarja Turunen but very unflattering for those of us with rather narrow set eyes...


Step 6. To finish off the look we need to apply the blackest eyeliner known to man (and woman). I started by lining the upper lash line with black gel liner and smudged it out softly. Then, with a black kohl pencil dipped into the gel liner I filled in my waterline. Tarja doesn't seem to be to big on false lashes so I just applied Lumene True Natural Mascara to my top and bottom lashes.


Step 7. On my lips I used the Instant Light Natural Lip Perfector (the pink one...) by Clarins and on my cheeks a teeny tiny bit of the blush Coy by e.l.f.


Hope you liked this tutorial and if you have any questions on it, just ask! :)

Thanks for reading!


söndag 7 april 2013

Inglot

Have I the best boyfriend in the world or what? Mr. Noire was in Chicago for a week and brought this home for me. :) *Happy girlfriend*


Swatches and reviews for these products will sure come! :) We don't have Inglot here in Sweden so I've never tried the brand before. *Jumping up and down in excitement*


I need help!

I'm just wondering, what would you like to see more of here on my blog? :)

I guess most people would like to see more looks, but what kind of looks?

And reviews? Do you feel that my reviews are helpful?

What about nail polish swatches and nail art looks? Do you like them?

Please tell me your opinion and help me to make this blog better! :) I do value your opinion dear reader and right now I would more than appreciate it so go on and give me some suggestions!


lördag 6 april 2013

Bare Minerals READY Compact Foundation

It has already been released in some places in the world but here in Sweden the launch isn't until mid-April. I'm talking about the READY Foundation by bare Minerals, which is indeed cause for great excitement.

For those of you who have used bare Minerals you are familiar with their "loose powder" foundations and I'm pretty sure that many of you have wished for a compact  version which would be much easier to handle. I definitely have! And now our prayers have been answered. :)

But don't be fooled, the READY foundation is not simply one of bare Minerals's previous foundations that they have pressed into compact form. This is a completely new innovation in which carefully chosen minerals have been pressed together with cold-pressed rose-hip oil to gain a unique product which provides a quick means to achieve perfect coverage and that hydrates the skin during the day. The foundation is long-lasting and after 12 hours the hydration level in the skin has increased by 108%. Fantastic, huh? :)


Along with this new foundation a new brush is launched, which is well suited for the special application technique that allows the foundation to spread properly across the skin. The brush is called Precision Face Brush and is without doubt the best foundation brush I've ever tried. The bristles are made of nylon and the dense, flat surface allows you to buff the foundation into the skin and achieve the most beautiful finish! of course you can use this brush with your old bare Minerals foundations as well!

Bare Minerals Precision Face Brush

This foundation is applied in long, smooth strokes across the face and immediately gives coverage. You don't have to work it into the skin the same way you do with the original or matte foundations, which saves you a couple of extra minutes in the morning.


The shade I'm using is called R130 (the lightest with a warm undertone)

At first I thought that READY foundation would be unsuitable for my oily t-zone but, honestly, it works better than the matte foundation to keep the shiny-ness in check all day. I guess that says more about my skin than it does about the foundation though - I'm obviously shiny because my skin needs moisturizing. After only using READY a couple of times my skin already feels healthier!

And for the drawbacks, there are very few. The only thing that I have to complain about is that it is very easy to "overdose" this foundation, so you have to be really careful not to apply too much!

But honestly, this foundation is a great friend that you definitely want to have in your life! (and makeup bag...)


Thanks for reading!


fredag 5 april 2013

Anastasia Brow Powder and Eye Brow Tutorial

In Sweden Anastasia is a pretty small, unknown brand, but as I understand it it is HUGE in the USA. I've heard it been labeled the #1 eyebrow brand in the world and having tried out their products I am not surprised.


When choosing one of the Anastasia brow powder shadows, keep in mind that the colors look way lighter in the packaging and when you try them out on the back of your hand (as most people do when shopping for makeup) than they will do on your brows. Instead, try them out on a piece of paper tissue to bring out their full intensity!

These products consists of a light/dark duet of shadows and for many people the first question that pops up is: "Do I really need two eyebrow shadows?"
And the answer is YES! You do! One lighter to fill in the whole brow and a darker to define.

I have nothing negative to say about this product so this is definitely a 5/5!


Now, let's take a look at how to use this product.


Step 1. Mark out the start, highest point and end point of your brows. The face chart shows you exactly how to do this! The red lines are imaginary lines from your nose wing to the places where you should put the marks.


Step 2. Begin filling in the "tail" of the brow with the lighter of the shadows. To do so use a stiff, angled eyebrow brush.


Step 3. Fill in the rest of the brow, also with the lighter one of the two shades.


Step 4. Now it is time to add some definition. Again, fill in the tail of your brow, this time using the darker one of the shadows. Work with short strokes and "blend" it in with the lighter shade.


Step 5. Place some concealer or cream highlighter underneath the brow. Blend out.


Step 6. Set the highlight with an eyeshadow close to your skin tone or lighter. Concentrate the highlighter right underneath the curve of the brow, at the browbone's highest peak.

There you go! Now you have good looking brows! (Hopefully...) :)

I really hope that this tutorial/review has been helpful to you and that you enjoyed reading it! Take care and hope to see you soon!