Visar inlägg med etikett Red Cherry #701. Visa alla inlägg

onsdag 10 juli 2013

Insomniac

After having done a lot of edgy, artsy looks lately I wanted to do something wearable. Yeah, yeah, I know that some of you will probably look like this ---> O_o <--- when I call this look wearable but I do think that most of my readers would actually wear this look. And if you think it's too much you can always tone it down! :)


There are a few eyeshadows on the market that look like this duochrome beauty; the pigment Blue brown by M.A.C., Inglot's pigment in #85 and the one I use here - Insomnia by Makeup Geek to mention a few of them. They are so yummy you'd like to eat them for breakfast! :D


To keep this look balanced and appropriate for a day at work I like to combine the vibrant eye look with a nude toned lip gloss and a flawless looking skin!


Face
*CC cream  Light (Lumene)
*Studio Finish Concealer (M.A.C.)* 
*Touche Éclat #1 (YSL)* 
*Mineral Veil (Bare Minerals)
*Bitten (Makeup Geek)
*Wonderblush Cleopatra (Make Up Store)

Eyebrows
*#391 (Inglot) 
*Brow powder Dark brown (Anastasia Beverly Hills)

Eyes
*Shadow Insurance (original) (Too Faced)
*Pigment Insomnia (Makeup Geek)
*Sketch (M.A.C.)* 
*Bitten (Makeup Geek)
*#351 (Inglot) 
*Gel liner Immortal (Makeup Geek)
*False eye lashes #701 (Red Cherry)

Lips
*Natural Code Lip gloss Milk Chocolate (Lumene)

-------------------------------------------------------------------------------

Would you wear this look or is it to much for you? For everyday use or as a night time look?


*Not cruelty-free

tisdag 7 maj 2013

Birthstones: Emerald

First, I want to say WELCOME to all my new readers! :) And welcome back to you oldies! :D I wish I could express in words how much I really appreciate all of you who takes your time to read my posts, comment and subscribe to my blog! I am truly honored to have you here!

Second, is it really May already? :O Where did April go? :O Well, my inner Spock-a-holic has been longing for the premiere of "Stark Trek: Into Darkness" for a very long time now so I am very pleased to see May's pretty face. :) Another good thing with May is that it has one of the most beautiful birthstones associated with it; the emerald.


Midori is the perfect emerald green. The lighter green on the middle of the lid was applied to give the look a little more dimension.


Shitty image, but at least you can get a grasp of the green shimmer in the middle of the lid.


A peachy pink cheek and hot pink lips brings out the green eye makeup even more. I've been experimenting a bit with vintage hair-dos lately, and this is one of my (sloppy) attempts to do a "front roll".


Face
*CC cream Light (Lumene)
*Studio Finish Concealer (M.A.C.) 
*Mineral Veil (Bare Minerals)

Eyebrows
*Browshadow Dark brown (Anastasia Beverly Hills)

Eyes
*Shadow Insurance (original) (Too Faced)
*Gel liner Mystic (Makeup Geek)
*Midori (Sugarpill)
*Eye dust Bamboo (Make Up Store)
*Heaven (Too Faced)
*Medium Pencil Sophie (Illamasqua)
*#391 (Inglot) 
*False lashes #701 (Red Cherry)

-------------------------------------------------------------------------------

I didn't do an image tutorial on this one since it's such an easy look, but I thought I'd write down the steps anyway in case you're wondering anything about it.


Step 1. Prime your eyes as usual.

Step 2. Draw and fill in the cat eye with a green base. As a base I used the gel liner Mystic by Makeup Geek.

Step 3. On top of the base, apply Midori by Sugarpill, leaving a little pocket open in the middle of the lid. On top of that pocket apply a shimmery green pigment. I used Bamboo by Make Up Store.

Step 4. Define the edges with a small brush and concealer.

Step 5. Line your eyes (waterline + upper lash line) with a black kohl pencil. Smudge it out a bit around the upper lash line, then set it with a black eyeshadow. Make sure the black is well blended into the green; we don't want a sharp eyeliner.

Step 6. Mascara and false eyelashes.

------------------------------------------------------------------------------------------

Soon I'll be starting a (hopefully) rather busy schedule at work over summer. I will be selling a lot of luxury cosmetics, which is really nice since the products are of such high quality and easy to recommend to a customer.

Anyways, I hope you're having a lovely time whatever you're doing! Thanks a lot for reading and a BIG thanks for all of you who comments and subscribes! :D


torsdag 25 april 2013

Engel

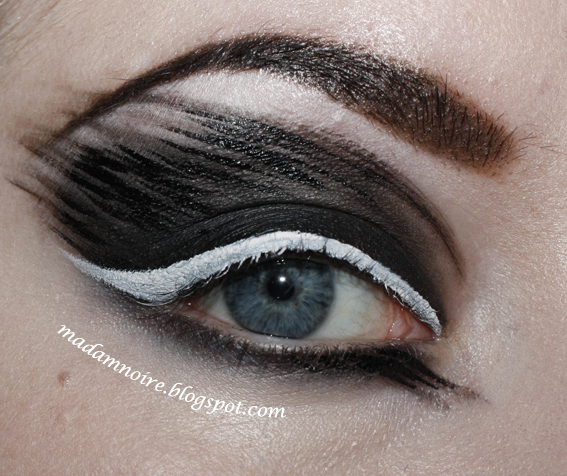
This is a requested look that is inspired by the Rammstein song "Engel" but also highly influenced by the work of this girl, that I have mentioned earlier. Her skills make me feel like an ignorant child. Anyways, I wanted to do a dark, somewhat feathery look (without it looking like that hideous Black Swan makeup...).


Scary is the new awesome!


Scary black eyes goes well with this look, huh? ;)


And so does black lipstick! I had so much fun creating this look and now I'm looking forward to do more creative looks like this one. :)


Step 1. Begin with filling in your eyebrows. They will work as a guide for where to apply the eyeshadows later on. Prime your eyes with your favorite primer.


Step 2. We want the blackest of black eyelid so we apply a black gel liner as a base and buff out the edges with a blending brush. Don't take it too far up, only about half-way up your mobile lid and then blend it upwards into the crease.


Step 3. Set the gel liner with a matte black eyeshadow. Blend it upwards but again, not to high up!


Step 4. To get a more even gradient from black to skin tone we take a matte grey eyeshadow and blend out the the edges of the black.


Step 5. I'm using a matte white as a highlight dragging it down into the black/grey shape to even out the smokey eye even further.


Step 6. Now, picking up some black eyeshadow on an angled brush, start drawing "lines" from the lid and upwards and outwards you can take them up over the eyebrow or end them below, that's totally up to you.


Step 7. Using liquid or gel eyeliner draw some more lines, so that we will have lines in different shades of black.


Step 8. Apply your base and darken your eyebrows.


Step 9. Border your upper lashline with a crisp white eyeliner ending in the classic wing.


Step 10. Line your waterline with a white eyeliner pencil. Apply mascara and false eyelashes and you're done!


Face
*Skin Base foundation 02 (Ilamasqua)

Eyebrows
*Browshadow Dark brown (Anastasia Beverly Hills)
*Corrupt (Makeup Geek)

Eyes
*Shadow Insurance (original) (Too Faced)
*Gel liner Immortal (Makeup Geek)
*#391 (Inglot)
*#339 (Inglot)
*Tako (Sugarpill)
*Jumbo Pencil Milk (Nyx)
*Aqua Color White (Kryolan)
*Glossy Waterproof eyeliner (Isadora)
*Drama mascara (Make Up Store)
*False lashes #107 (Red Cherry)

Lips
*Lipstick Goth (Viva la Diva)

-------------------------------------------------------------------------------


I really hope you liked this look!

I was thinking about writing about some skin care products some day soon, would that be of any interest to you readers? :)