torsdag 12 april 2012

Tutorial: Plague rats!

Hello everybody! :)

The absence of blogposts lately is due to some very time consuming things that have happened the past week. I've told in previous blogposts that I have moved recently and now it's time again. Me and Mr Noire have got a nice apartment in one of the best parts of this town and are moving in there in the beginning of May. Yay! :D We thought we'd have to wait for at least a year to get an apartment there but it took only a month.

Anyways, the other day I went to an Emilie Autumn concert which was great! What a show! She's a very talented musician and show artist so I thought I'd do a makeup look inspired by the way she usually wears her makeup.

If you're not an Emilie Autumn fan you can of course use this look anyway, just skip the heart or exchange the red for another color. :)


Whether you're a hard core fan or just like her artistry you have probably noticed that Emilie Autumn often uses a lot of black under her eyes and combined with a heart under her left eye (I think it is...) this is the characteristic of her eye-makeup look. 


It's a great look without the heart too and you can combine the black lower lash line and long bottom lashes with any upper lid color you want. :)


Another of Emilie Autumn's characteristics is doll like lips, you know, the kinds that where popular in the twenties. I like this lip-look too because it makes my lips look fuller and more proportional.


Step 1. As usual, prime your eyes with your favorite primer to prevent the makeup from creasing. Then, apply NYX Jumbo pencil in Milk over your upper lid and blend it out evenly. Take it out a bit in the outer corner since we are going to make a cateye. 


Step 2. Take a vibrant red eyeshadow (or any color actually) and pack it onto your upper lid and extend it into a cateye. You can use Scotch tape if you want but it doesn't have to be that neat so I won't bother to do so. 


Step 3. Blend the red out (very lightly in the outer edge, since we still want it a bit sharp there). With a soft black eyeliner pencil line your eye (and your waterline). Extend it along the bottom edge of the red cat eye.  


Step 4. Using a small brush blend out the eyeliner pencil and then set it with black eyeshadow. 


Step 5. Highlight under your eyebrows with a matte white eyeshadow. Fill in your brows with a black eyeshadow. If your natural brow color is quite fair you want to be careful and maybe wipe some black off of your brush before applying it onto your brows. Otherwise, it might look a bit harsh, like the brows of a cartoon character. 
Apply black mascara to your top and bottom lashes. 


Step 6. On your left eye draw a line with the black eyeliner pencil, downwards. On the end of the line draw a heart shape with a white eyeliner pencil. The reason we draw it in white first is that the white eyeliner is easier to remove in case we draw it wrongly that the black one. 


Step 7. Fill in the heart shape with white eyeliner (NYX Jumbo pencil) and then, using a small brush, pack on some red eyeshadow on top of it. 


Step 8. Draw around the edges of the heart with liquid eyeliner. Liquid eyeliner leaves no room for mistakes so be careful! 
Apply some glitter to the heart (optional) and a pair of false bottom eyelashes. The eyes are now done! :)


Step 9. Erase your lips with a creme concealer. Draw the shape of the lips with an eyeliner pencil.


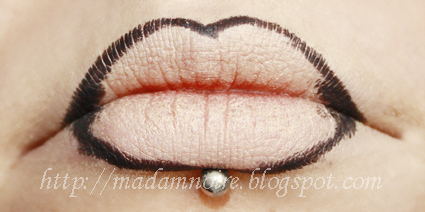
Step 10. Blend out the black, inwards towards the center of the lips. 


Step 11. Fill in the lips with a red lipstick. I've used Russian red by M.A.C. and on top of that Luscious Liquid Lipstick in Cherry tart by e.l.f. 

So, that's all for this blogpost! I hope that all of you will have a lovely weekend and that I will be able to do a blogpost again soon. I'm thinking about doing a look inspired by the evil queen in the "Snow white and the huntsman"-movie that hasn't had premiere yet. 


måndag 9 april 2012

Cold spring

Hello everybody!

Hope that you all have had a great Easter holiday! :)
The look of today is another spring inspired look. I don't know what it is with spring but everything bursts out in color and it's hard not to get inspired.
It's raining here today and I figured that a pop of color would be nice!


Face
*Everlasting foundation Ivory (Clarins)
*Studio finish concealer (M.A.C.)
*Blush Glow (e.l.f.)

Eyebrows
*Charcoal brown (M.A.C.)

Eyes
*Fluidline Blacktrack (M.A.C.)
*Eye kohl Smolder (M.A.C.)
*Poison plum (Sugarpill)
*Deep truth (M.A.C.)
*Lucky green (M.A.C.)
*Fuji (MakeupGeek)
*NYX Jumbo Pencil Milk
*False eyelashes #110 by Red Cherry


torsdag 5 april 2012

LOTD: Wearable teal

Hello everybody! :)

This look is perfectly wearable and something I don't do myself very often. But I know a lot of you guys like wearable makeup so I'm trying to do some wearable looks every now and then. :)

Anyways, here's some inspiration for wearing teal again, since this seems to be a very hot color (haha...) right now. This look is perfect for all kinds of occasions where you want a subtle pop of color that doesn't scream "Look at my makeup!!!".


In the inner corner I've used Matt glory, which is a soft pink, by MakeUpStore and on top of that Shimma shimma by MakeupGeek to create more softness. I didn't want the pink to be very pink so applying Shimma shimma is a perfect way to tone a color down and add some shimmer to it. 


I really think this look is a perfect spring look for all of you out there wanting to use light colors and shimmer to welcome the returning sun. :) The winged eyeliner adds a retro feeling to it! 


I used Matt glory on my cheeks too since it's really a blusher and not an eyeshadow. I've just used my regular nude lipgloss for this look (mainly because my lipgloss wardrobe isn't that big...) but I think a soft pink lipgloss with shimmer would be the crown of this look. 

Face
*Everlasting foundation Ivory (Clarins)
*Studio finish concealer (M.A.C.)
*Blush Matt glory (MakeUpStore)

Eyebrows
*Charcoal brown (M.A.C.)

Eyes
*Fluidline Blacktrack (M.A.C.)
*Matt glory (Make Up Store)
*Sea mist (MakeupGeek)
*Shimma shimma (MakeupGeek)
*NYX Jumbo Pencil Milk
*False eyelashes #110 by Ardell


That's all for today! :) Happy Easter holidays to all of you!

tisdag 3 april 2012

Tutorial: Sunrise

Hello everybody! :)

I think I might do Tuesday to my tutorial day, but I'm not sure yet. :) Today we're definitely doing a tutorial here and it will be something colorful!


This look really reminds me of a sunrise (or maybe a sunset). I wanted the outer corner to be more of a coral shade rather than orange, hence I mixed some orange and pink. 

Anyway, let's get this tutorial started already. 


Step 1. I guess nobody is surprised that the first step is to prime your eyes? I've also filled in my eyebrows with Charcoal brown by M.A.C. 


Step 2. I've applied a mixture of Chickadee by MakeupGeek and Buttercupcake by Sugarpill to the inner corner of my eyes. Why the mixture? I wanted a more toned down yellow and none of the shadows alone could give me this so I mixed them together. :) 


Step 3. In the outer corners of your eyes, apply Flamepoint by Sugarpill. Blend it outwards and upwards and into the yellow. To help it blend into the yellow use some Chickadee as a transition color. 


Step 4. In the outer portion of the orange apply a soft pink to achieve a coral shade. Also put this pink in the crease and blend upwards. The pink I've used is the blusher Matt glory by MakeUpStore. 


Step 5. First, apply a matte white underneath your brows as a highlight. Then, take some of NYX Jumbo pencil in Milk on a small brush (preferably synthetic) and apply it to your waterline. 


Step 6. Pick out your Poison plum by Sugarpill and apply it on the waterline and underneath the lower lashline. Blend it out! 


Step 7. Line your upper lashline and waterline with a black gel eyeliner. It looks kind of messy right now but it will be all right once we've got the mascara and falsies on. 


Step 8. Mascara and false eyelashes. (Oh my how washed out the colors look on this pic!) 


This look is completed by applying a clear lipgloss. 

I hope you like the look and that the tutorial has been helpful to you! :) Have a nice day everyone! 


måndag 2 april 2012

LOTD: Sea and earth

Hello everybody!

Today I'm going to try on some of my new MakeupGeek eyeshadows. One of them is a gorgeous teal called Sea mist which is so, so beautiful! Teal is such a beautiful color and I think it looks great on both blue and brown eyes.

I don't follow trends myself, but being an active member of the makeup community and not knowing the current makeup trends is pretty much impossible. And teal is one of the big trends this spring. So this is a perfectly wearable look that contains this beautiful color! :)


I wanted to add an unexpected color to the waterline so I chose gold. This "eyeliner" is made of the eyeshadow Gold digger by MakeupGeek on top of NYX Jumbo pencil in Milk.


I think that this reminds a lot of the Cockteal look by Meredith Jessica from Pigmentsandpalettes.com but still it's quite different. :)


For my lips I just used a hot pink lipstick and toned it down with a nude lipgloss. I think it gives a pretty color but still not too harsh. Of course, since there are lipstick in pretty much every existing color out there you could just use a softer pink one. 

Face
*Everlasting foundation Ivory (Clarins)
*Tone correcting concealer Ivory (e.l.f.) 
*Wonderblush Cleopatra (MakeUpStore)

Eyebrows
*Latte (MakeupGeek)

Eyes
*Fluidline Blacktrack (M.A.C.)
*Pollution (Make Up Store)
*Sea mist (MakeupGeek)
*Latte (MakeupGeek)
*Embark (M.A.C.)
*Gesso (M.A.C.)
*NYX Jumbo Pencil Milk
*Gold digger (MakeupGeek)
*Charity (MakeUpStore)
*False eyelashes #110 by Ardell

I have no idea what my next look will be but I'm pretty sure I'm going to play around some more with my new MakupGeek eyeshadows. :) I'm also going to do a review and swatches of them some day soon but I want to test them a bit first so that I can give some kind of opinion on them. 

Have a lovely day! :) 


söndag 1 april 2012

Monthly theme: Flowers

Hello everybody! :)


As I've mentioned in previous blogposts I'm participating in the monthly theme on http://www.sophistiquenoir.com/ again and this month's theme is flowers.
Since the makeup is mainly red and I've spent half day listening to The Cure I decided to call it "Bloodflowers". ;)

I didn't have the time to do a tutorial today but if people would like to see a tutorial on this one I will be happy to make it later.


I'm wearing a hat because I dyed my hair and my hairline is a mess. :P 


Face
*Clarins Everlasting foundation
*M.A.C. Studio Finish Concealer NC15

Eyebrows
*Charcoal brown (M.A.C.)

Eyes
*Eye Khol Smolder (M.A.C.)
*Pollution (Make Up Store)
*Gold digger (MakeupGeek)
*Love+ (Sugarpill)
*Buttercupcake (Sugarpill)
*NYX Jumbo Pencil Milk
*Shimmery white from an Isadora palette
*Fluidline Blacktrack (M.A.C.)
*False eyelashes #105 by Ardell

That's all for this post! I hope you all have had a lovely weekend and are well rested and prepared to take on next week.