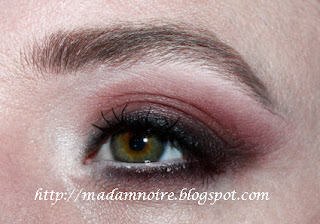
This months theme at www.sophistiquenoir.com is "Someone special", and my blogpost will feature my own, very special soulmate; Mr. Noire. :)
This will also be a tutorial for people with hooded eyes, since there are some tips and tricks to "lift" the hooded lid to make the eye look more open and awake.
Step 1. As usual, start by priming your eyelids. Mr. Noire has much, much thicker eyebrows than I have (obviously, since I don't have any eyebrows at all...) and a lot less space between the lid and brow so the eyeshadow will be applied a little differently than I do on myself. :)
Step 2. After priming I added a kohl pencil as a dark base. With hooded lids the best thing is to add the dark color along the lash line and "smoke" it upwards since we don't have any visible crease to work with.
Step 3. Then I punched Mr. Noire in the face, giving him a black eye... No, I'm just kidding. ;) Apply a dark red eyeshadow on the top and bottom lid. (I used Bitten by Makeup Geek, which I'm currently obsessed with...). Blend it upwards and if you want to take it above your "hood" blend with your eye open looking straight into the mirror. When looking straight into the mirror you can also make sure that the eye is "lifted" in the outer corner. Since hooded eyes tend to slope downwards a little in the outer corner this is important to make the eye more open and awake and less "sad-looking".
Step 4. Now, apply your base. Then line your upper lash line/waterline with black gel liner. Then take a black eyeshadow and apply it along the upper and lower lash lines and blend it upwards to get the smokey effect. In this step it is also important to make sure that the black shadow leans upwards in the outer corner so that it doesn't drag the eye down.
Step 5. Apply a creamy white or nude pencil liner to your lower lash line to open up the eye even more. Then, highlight the inner corner and the browbone with a matte white eyeshadow. Curl your lashes and apply black mascara. Fill in your eyebrows with a light brown eyeshadow.
Step 6. Finally, apply a pair of false eyelashes, and you're done. ;)
----------------------------------------------
And finally, a picture of me and Mr. Noire together. I know I've posted this before but I really like this picture. :)
I hope this tutorial has been helpful for all of you out there with hooded lids. It was big fun to do a tutorial on my boyfriend instead on myself. :)
Thank you so much for reading and subscribing! Have a great day and hope to see you soon!


Such a cute couple photo!
SvaraRaderaThank you! :)
RaderaI love that you used him as your model for this post xD
SvaraRaderaHaha, it's a fun idea, isn't it? :)
RaderaI have hooded eyes and similar eye color as Mr. Noire, this tutorial is perfect for me!I need to try this.
SvaraRaderaI'm glad to here you found help from this tutorial! :)
RaderaMr. Noire is a great sport!! :-D I really enjoyed your unique take on the Someone Special theme. It's always especially awesome when a blogger can take the theme and transform it into something that still fits in with the main topic of the blog. Very entertaining, and a gorgeous makeup look!
SvaraRaderaYeah, he is! ^_^ Haha, I thought it might be entertaining to do a makeup look on my man. Besides, he likes it when I practice makeup on him. :3
RaderaWow your boyfriend is awesome for letting you put makeup on him. His eyes looked gorgeous when they where finished, he has a beautiful eye colour.
SvaraRaderaHaha, yeah I'm lucky with that. :) I think so too, his eyes are amazing. :D
RaderaOh that tutorial is great. My eyelids are starting to hook a bit since I got a bit older. The makeup is so nice. It was very sweet of him to let you do this tutorial on him :)
SvaraRaderaI'm glad you think so! :) Yes, he is such a sweetheart. :D
RaderaI LOVE this post and I love that your Mr. was your makeup model! HOORAY!
SvaraRaderaAlso the couple post is gorgeous!